If you are working with video data, you might want to present selected video clips at research group meetings or data workshops. Here’s a quick recipe for how you can create a short clip from a longer video segment, and then add subtitles to the clip.
For these tasks, I use iMovie and InqScribe. iMovie is Apple’s stock app for video editing, while InqScribe is a transcription program developed by Inquirium. Having experimented with InqScribe, HyperTranscribe and Nvivo for transcribing audio and video data, Inqscribe is definitely my favourite. It’s easy to use, has good customisation for snippets and shortcuts, and a clean user interface.
Creating a short clip from a larger segment of video data
First, create a new project in iMovie and import the video files that you need.
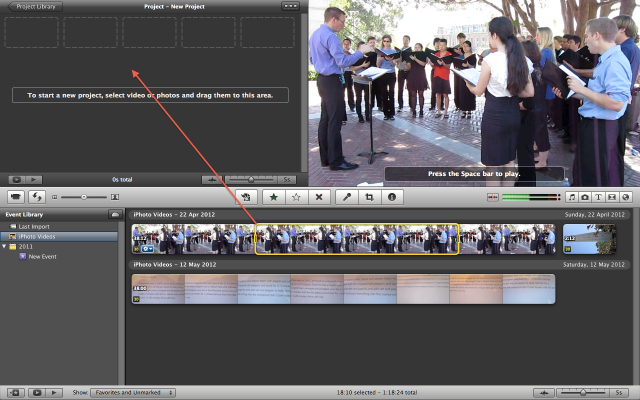
In the video browser (bottom right in the screen shot), use the yellow square to select the video segment that you would like to make into a separate file, and then drag the segment from the video browser to the project area (top left).
You can then replay the selection to check it, and add and delete segments as needed. Once you are sure that the clip includes what you want, select ‘Finalize Project’ from the File menu. After this process has been completed, select ‘Export Movie’ from the Share menu. Here you can define the format of the movie as well as where you want to save it on your hard drive. Now you’re done with the first step.
Adding subtitles to your clip
To add subtitles, first open a new file in InqScribe and import your new video clip. Then transcribe the file (or, if you have done this already, copy and paste from your previous transcript).
The key to getting the subtitles right is to insert the time code at the right intervals. The time codes indicate when new subtitles will be shown on the screen. If you have too many lines of text after each time code, half of your video screen will be filled with subtitles. There are also some particular characters you should try to avoid. For more details on this process, see this link from Inqscribe.
When you are done transcribing, select ‘Save Subtitled QuickTime Movie’ from the File menu. This opens a window where you can designate, among other things, where to save the file, the type and size of the font for the subtitles, where on the screen the sub titles should appear, and whether the clip should be exported as a stand alone file or just be linked to the existing video file. Make your selections and click save.
And now you think you’re all ready to play your subtitled video clip in QuickTime Player… except that, you’re not. The latest version of QuickTime doesn’t show subtitles (version 10.2 at the time of writing) on Mac OS Lion/Mountain Lion. Therefore, you need to download this older version of QuickTime, which will be stored in your application folder under Utilities. Open your subtitled file with QuickTime Player 7, and all should be well!

